
I could start off by showing you the result of high heat on scrambled eggs, but chances are, you've already tasted them. Many of you have had them all your lives. Sometimes they may be cooked to the point where the water is released from the eggs, and you're left with soggy, liquidy eggs. Appetizing, right? I'm not going to do it that way. Cooking your scrambled eggs over high heat is overkill. You're left with a dry rubbery product which resembles a sponge more than it does eggs. This is why I like to cook my eggs "medium rare". By cooking over a low heat and constantly stirring, you're gently and evenly heating your eggs up, which will provide a creamy, luxurious texture for your eggs. Pulling them off the heat before the eggs have fully cooked ensures that they haven't been overcooked, and you're left with a fantastic plate of eggs. Once you've tasted scrambled eggs this way, you may never overcook them again.
The Scrambled Egg Part 1: Low and Slow
We're going to start off as we did before, with some great eggs and some great butter. Leave your eggs and your butter out until they get to room temperature, about 30-45 minutes. You're going to need a silicone spatula, a nonstick pan, a mixing bowl, and a whisk.

Start out by cracking your eggs on a flat surface into a large mixing bowl.

Whisk the eggs until the surface is dotted with air bubbles.

Heat up a nonstick skillet over low heat and add about a tablespoon of butter.

Once the butter has melted, add your eggs and immediately start stirring with your nonstick spatula.

The key to this method is to never stop stirring your eggs. As you continue to stir, you're constantly moving around and agitating the eggs and preventing them from setting. The eggs become heated evenly as the surface area exposed to heat is constantly changing. Think of your scrambled eggs eggs like your children. Don't leave them unattended, and never stop agitating them until they do what you want (ha).

As you're stirring, make sure you're stirring with smooth, gentle motions. This is going to produce long egg "curds" which will have an incredible texture in the end. Make sure you're paying attention to the sides and the middle of your pan when you stir. I like to stir in a figure 8 pattern, and then move from left to right.

As you can see, our eggs have already begun to thicken. They're still very much in a liquid state, but it looks like there are some nice looking curds developing. If you start seeing a lot of solids in your eggs, take your pan off the heat immediately and don't stop stirring. This is the point where we want to add some milk or heavy cream. I'm going to be using a little bit of some whole milk. In keeping with using great ingredients, I have a organic grass fed whole milk.

We're going to add a splash to the pan. This will slow down the cooking process.

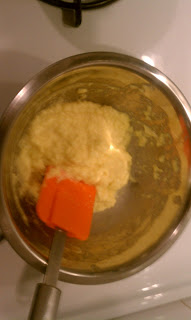
Mix the milk or cream thoroughly with the eggs. Once the eggs look about 3/4 of the way done, take them off the heat and get them onto your plate immediately. The mixture should be still slightly liquidy, but fairly thick. When you stir the eggs around with the spatula, they should mostly keep their shape. You want them to look like this:

If you take them off the heat when they look done, they will be overcooked. The idea is to take them off the heat just before they're fully cooked. They'll continue to cook from their own residual heat. Season them with salt and white pepper, get them onto a plate immediately and eat!

What we're doing is we're taking the eggs off intentionally while they're still a little underdone. What you should be left with is a very rich and luxurious plate of scrambled eggs. It should be almost the texture of a thick custard. These eggs take to herbs very well, so if you have a little bit of fresh parsley, tarragon, or chives you want to chop up, feel free to add them.
This method produces eggs with a texture like no other. It should fall somewhere on the border of a solid and a liquid, and is creamy and luxurious, and at the same time inexpensive and humble. Now that we've familiarized ourselves with the low and slow method of scrambled eggs, we're going to take things down another notch and go even slower. How is that possible you ask? We've already cooked our eggs on the lowest heat setting on our stove, how is it possible to cook them over lower heat than that? The answer, my friends, lies in a water bath.
The Scrambled Egg Part 2: Lower and Slower
To become aware of this method, we need to look at the process of heat transfer. Whenever you're heating up a can of soup, for example, you may start by turning on the burner and placing your saucepan over the heat. In order to heat up your soup, you're putting your saucepot over the fire or element (your heat source) which is transferring that heat to the pan you're using. From there, that pan heats up and transfers the heat to your soup. As the water rises up and begins to approach its vapor state, it starts releasing steam, which is continuing to transfer the heat upwards. If you have a lid on, much of the vapor bounces right back rather than escaping, and transfers heat back to the liquid, heating the liquid more quickly than if you had the lid off.
Looking at the 4 different carriers of heat, we can naturally assume that the heat source (the fire or the element on your stove) is going to be the hottest, followed by the pan since it's closest to the heat source, followed by the liquid, and then the vapor. Since the vapor is furthest from the heat source, it provides the gentlest possible heat since the heat from your stove has to move through the pan, the liquid, and the air to reach whatever it is you're heating up. In this method, we're going to cook the eggs over a low simmering water bath.

To do this method, you're going to need a 3 or 4 quart saucepan, a metal mixing bowl that goes over the top, and of course, a silicone spatula and a whisk. I prefer to use a separate mixing bowl to whisk the eggs, but if you only have one, you can use the same bowl to cook your eggs (make sure it's heat proof). Start off the way you did before, cracking 2 or 3 good quality room temperature eggs into your mixing bowl.

This time, we're going to be adding both milk and a little bit of cream to our eggs.

Whisk this mixture together until air bubbles form at the surface. Meanwhile, heat up your saucepan over high heat until simmering. Once it's simmering, turn your heat all the way back down to low, and place your metal bowl over the top with roughly a tablespoon of butter.

Once the butter melts, add your eggs and don't stop stirring!

You're probably going to notice the cooking process moving along a little more slowly than before. This is a good thing, since it allows us more time to work with and stir the eggs so that they cook evenly. The mixture will continue to thicken as we're heating it up.

As soon as the eggs develop curds, and the liquid thickens, take it off the heat. Season it with salt and white pepper and get it onto your plate immediately.

As we can see here, we're left with a creamy mixture that's even more uniform than the first one. Because we're cooking so far away from the heat source, the eggs are cooking more slowly and evenly. We're left with a uniform mixture that looks and tastes incredible, with smaller, more evenly distributed egg curds.
The Conclusion
We investigated cooking eggs using 2 different methods providing varying degrees of heat for the egg to cook. It turns out, contrary to popular belief, it's far better to undercook your eggs than overcook them. And if there's one thing we've learned so far, it's that eggs cook quickly. If you can't work as quickly as the egg cooks, then they're probably going to be overdone. So the question when cooking eggs should always be how slowly and gently you can cook them. Indeed, it's clear that the proverbial tortoise will beat the hare in the end. By taking your time and getting things right the first time, you're always going to ensure a much better product in the long run. I highly encourage you to give either of these scrambled egg methods a try for yourself. I think you'll be pretty happy with the result.
No comments:
Post a Comment